Thursday, July 31, 2008

coming up next tuesday...

Photobucket
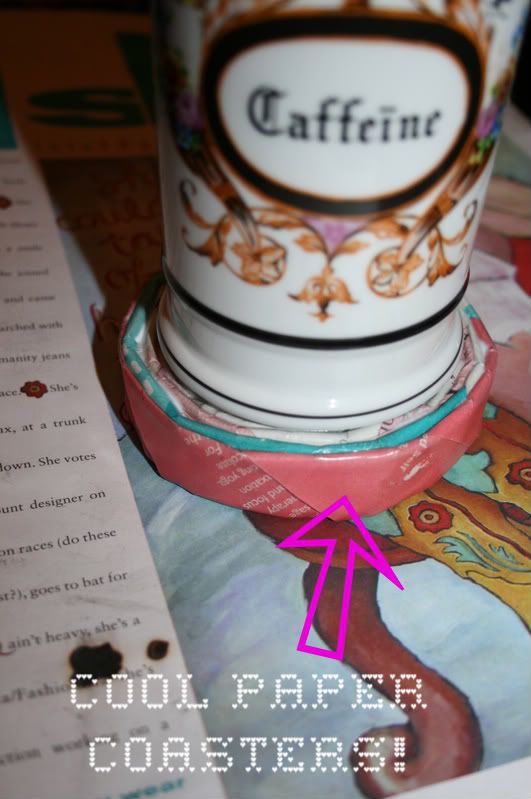
come make a great set of coasters tuesday august 5th. we'll be giving a new life to old folio and skirt magazines. we're turning them into cool COASTERS! woo hoo! it's a super fun project and it looks even better in person! see you at 6:30 tuesday night!

xoxo,
emily

Tuesday, July 29, 2008

one man's trash is another man's craft


yet another rainy evening, but still a lovely night for crafting! i really enjoyed tonights project and know all the reclaimed bottles will enjoy new lives as vases in homes! each bottle had such a unique look because of the different fabrics/combinations each crafter used. i love seeing and hearing new ideas being bounced around the room by everyone. and it's kind of crazy but in a weird way i'm a little rejuvenated by it all. even though it's almost 10PM and i just got home, ate a bowl of cereal and sat down to upload pictures/write about tonight, it's still really fun and i'm enjoying meeting so many creative people! thanks to all who've come to support our craft night! it's so much fun!

the vases turned out beautifully! oh and i also wanted to thank everyone who came this evening not only for helping but also for cleaning up too! it really helps me close up the store faster! thank you!

here's some crafty google thought up... have you heard about blackle.com? my cool friends jimmy and genora told me about it a couple of weeks ago. anyway, if you go to blackle.com instead of google.com you will save energy because the screen is black when you do the search. don't worry, it's the exact same search engine as google, so if you are partial to that search engine, it will give you the same results. switch your homepage now... what a great and simple way to conserve energy!

stay tuned for next weeks craft...

RECYCLED BOTTLE VASE: HOW-TO

If you'd like to turn a glass bottle into a cute vase here's what you need to do...

gather up your supplies. you will need:
  • a glue gun and glue sticks
  • various ribbon, yarn, and/or old fabric
  • glass bottle(s) *you can use plastic but glass is heavier and more sturdy.
  • optional: buttons/beads, etc... to embellish if you'd like.
if you are using fabric to wrap the bottle, you will want to cut it into long strips. you can choose how wide you want the strips to be, thinner vs. thicker will give the vase a different look. this project is all about experimenting with materials and color. get a little crazy...

now... start at the very top of the bottle (or base, either way works, i just started at the top.) and put some glue on your fabric and line it up flush with the lip of the bottle. glue it down. now, slowly begin wrapping your material around the vase, stopping every 5 or so wraps and putting a dot of glue down to keep the fabric from slipping. the most challenging part of this project is wrapping the curve where the neck of the bottle widens. you may need to use more glue here and wrap a few layers to get all the glass to cover.


**here are a couple bottles partially wrapped. if you leave some glass showing, it's easier to cover up with another layer. you can't mess this up!


continue wrapping until the whole bottle is covered. when finished, glue down the last bit of the fabric and trim around the bottom, if necessary. some crafters added buttons, etc... to jazz it up a little more. the sky's the limit!

HINT:
this project looks really cute if you make a set of three in different shapes and sizes. makes a nice little bottle collection on a shelf. :)

Sunday, July 27, 2008

Ooh la la.

Come make a lovely vase out of a recycled bottle this Tuesday at Anomaly! I used a champagne bottle but you could really use ANY TYPE of bottle you'd like. A short vase (from a beer bottle) would be really cute. A set of 3 on a shelf would be even cuter! We will be wrapping the bottle in ribbon, strips of vintage fabric, yarn, etc...

WHAT TO BRING...
*$5
*a bottle (plastic or glass, any size), if you'd like. i will have beer bottles on hand for everyone.
*beverage(s) of your choice.

Looking forward to Tuesday! Feel free to call or e-mail if you have any questions!

xoxo.
emily

Wednesday, July 23, 2008

Despite the rainy evening...

We had another Craftacular night Tuesday! YAY!!! We have had 2 classes in a row where not 1 but 2 tables were full! I need to get some more chairs, but hey, that's a great problem to have! I love seeing crafters out in full force and this group was as diverse as ever! Everyone that showed up was super cool and diverse, but when has it not been? We had a great grandmother, a boyfriend and

girlfriend, a 9 year old (she's a repeat!) and her cool aunt, among many others! I just can't tell you how much I appreciate all the support our craft night has been getting. It's so much fun to get together with new people and all share one common interest... making something! And it's such a great place to bounce ideas off of each other!


One of my favorite parts of the evening was when, at one point, everyone concentrating on their projects so much that the room was silent. All in all it was a great evening and making a fabic necklace is so fun and super easy.


so, i know... you are sitting in your desk at work, reading this and wishing you could make one too!!! well you can and here's how...

all you need is:
  • scissors
  • assorted wooden beads or marbles (we even recycled some beads from broken necklaces) it doesn't matter what they look like b/c they will be covered.
  • a 1-2 in. wide strip of a fabric of your choice... thicker fabrics make chunkier knots. (we were measuring the length of the fabric by stretching out our arms and cutting it as wide as our "wingspan"... i'm so technical!)
    *a little tip... i like ripping the fabric instead of cutting to make it look frayed. it give the necklaces a nice touch. just cut a slit to start the fabric and then pull!

once you get your strip of fabric ready, you simply fold it in half (to find the middle) and make a knot about an inch to the left or right of the mid point. it's easier to start in the middle and work your way out. place your bead as close to the knot as possible and wrap the fabric around it. then tie another knot. make sure your knot is as close as possible to the bead to keep it secure. repeat until you like how your necklace looks. i kept mine long and tie the two ends together to finish it off. that way, it just slips over my head for an instant accessory!

REMEMBER: a great thing about this project is you CAN NOT mess this it up! the look of it is really organic so if you run out of fabric, just knot more onto each end. and if you want to get really crazy you can even mix it up a bit and add a different print/color! JUST HAVE FUN! :)


oh and i have to give a shout out to my friend robin and joy! THANK YOU BOTH SO MUCH for coming and helping out and staying late to clean up after! you are awesome!

i'm thinking up a project for next week so check back soon to see what it is!

xoxo,
emily


Friday, July 18, 2008

Come make a TOO CUTE beaded fabric necklace on Tuesday!


Tuesday night we're crafting an adorable fabric covered beaded necklace.

Just bring your booze, yourself, and $5 and craft the night away!

The fun starts at 6:30.

Thursday, July 17, 2008

stencil totes = good time!

YAY! Another great turnout at craft night! It's really so much fun every week to meet so many different people! The stencil tote turned out to be a hit and I even got to stencil a cute tee for my friends 3 year old daughter and one for my son too!

I supplied natural colored totes for all the crafters and then we made stencils by cutting the negative space out of animal silhouettes. It's a really simple craft that can double as eco-chic gift wrap. Wrapping a present in this reusable tote is sure to delight the recipient!

It makes it a great alternative to disposable gift bags and can then be used as a beach, grocery or library tote.

I've been crafting alot this week. I've been working on a knitting project that I finished last night. It's a mixed fabric neck warmer made from recycled materials. I cut vintage lace and a t-shirt into strips, tied the ends together and then knitted it back together. I will post a picture of the finished project if I remember.

It was really rainy all day at the store today, so that means it was totally DEAD. I took advantage of a little free time and made a few purses and a custom baby sling. I've been obsessing over some vintage fabrics that I finally got to use today. My sewing machine has been out of comission for about a month but she's repaired and back in business.


Stay tuned tomorrow for next Tuesdays project. It's going to be fun... I'll give you a hint... it's something to wear.


Tuesday, July 15, 2008

Stencil A La Mode

Come make a cool stencil tote bag with us TONIGHT @ 6:30! Get here early so you don't have to sit on the floor! :)

What to bring:
  1. $5
  2. an exacto knife if you have one or a good pair of scissors (totally optional but will make it easier to cut out your stencil.)
  3. libations, if you'd like one
I will post pictures (and a tutorial if i get around to it) tonight or tomorrow. XXOO!

Call us at 904-354-7002 if you have any questions!


Wednesday, July 9, 2008

Crafty or not... Here I come...

With the growing interest in craft night I am happy to lauch my new blog "If you're crafty and you know it..." in conjunction with Craftacular Tuesdays at Anomaly! I will be posting past projects, info for upcoming projects and anything else that interests or inspires me.

This past Tuesday night we made the most adorable fabric and ribbon rosettes! We used scraps of fabric, ribbon and lace, beads from broken necklaces, and vintage buttons galore!

The turnout was great... 13 people came, not including myself! I'm starting to get worried that I may have to have signups before hand so I will know how many to expect! We ran out of chairs this week! All different ages and backgrounds were there and I really enjoy that because it always keeps the conversation interesting.

Note to Self: Must remember name tags next week as all these new names are hard to remember!!! :)


Craft of the Week: Ribbon Rosettes

Everyone's flowers turned out so adorable and I love the twist each person took on this to really bring her personality and style into the project. (Want to learn how to make this cuteness? I am working on the tutorial for this and it will be up soon!)